
In order to distract myself from the fact the Hubs finally left back overseas, I dove headfirst into my projects! A few months ago, I found a tutorial on Pinterest to make a pillowcase mattress. I just *had* to make one for Little Miss. It was a good tutorial, though I still managed to flub it up a bit. But I loved the end result so much, I knew these would make for perfect gifts.
So 2 days ago I started gathering my supplies and looked back online for the tutorial...and its gone!! I was frantic, then my husband looks at me (like I have lost my mind) and says, "Quit nuking it Shannon, just wrap the material around the pillows." That man is a genius, but don't tell him I told you that though. I came up with this tutorial and I had to share it with everyone, I am so proud of myself!

Supplies:
3 yards of material
4 pillows
sewing supplies
First, make sure you wash the fabric. You don't this to shrink after you've sewn it all together.
Next, lay out your pillows on the fabric. I placed mine slightly off center.

Then I folded over one side of the pillows, then the other.


I left about 3 inches of fabric above and below the pillows, then I cut off the excess fabric from the bottom.

I pinned over the long sides of the fabric so I could hem.


After sewing up both sides, I laid out the fabric BUT WITH THE WRONG SIDE OUT and put the pillows in. Then I folded over both sides again.
 |
| Fabric is wrong side out, one side folded over |
 |
| Fabric is wrong side out and folded over the pillows |
 |
| Fabric is inside out and the short sides (top & bottom) are pinned |
After sewing the top & bottom, then you turn the fabric right sides out.
 |
| Turning the fabric to right sides out |

Time to create the pockets for the pillows. Measure the length of your fabric. Mine was 72 inches long. Now divide that number by 4, which gave me 18. So every 18 inches I drew a line and pinned to make a place for the pillows. You end up with 3 rows of pins.
 |
| One row of pins |
 |
| 3 rows of pins (you may have to squint to see lol) |
Wasn't that easy? Now its time to enjoy your pillowcase mattress. Let Little Miss show you how:


I am so proud how the back of the mattress turned out, see its a straight line!!

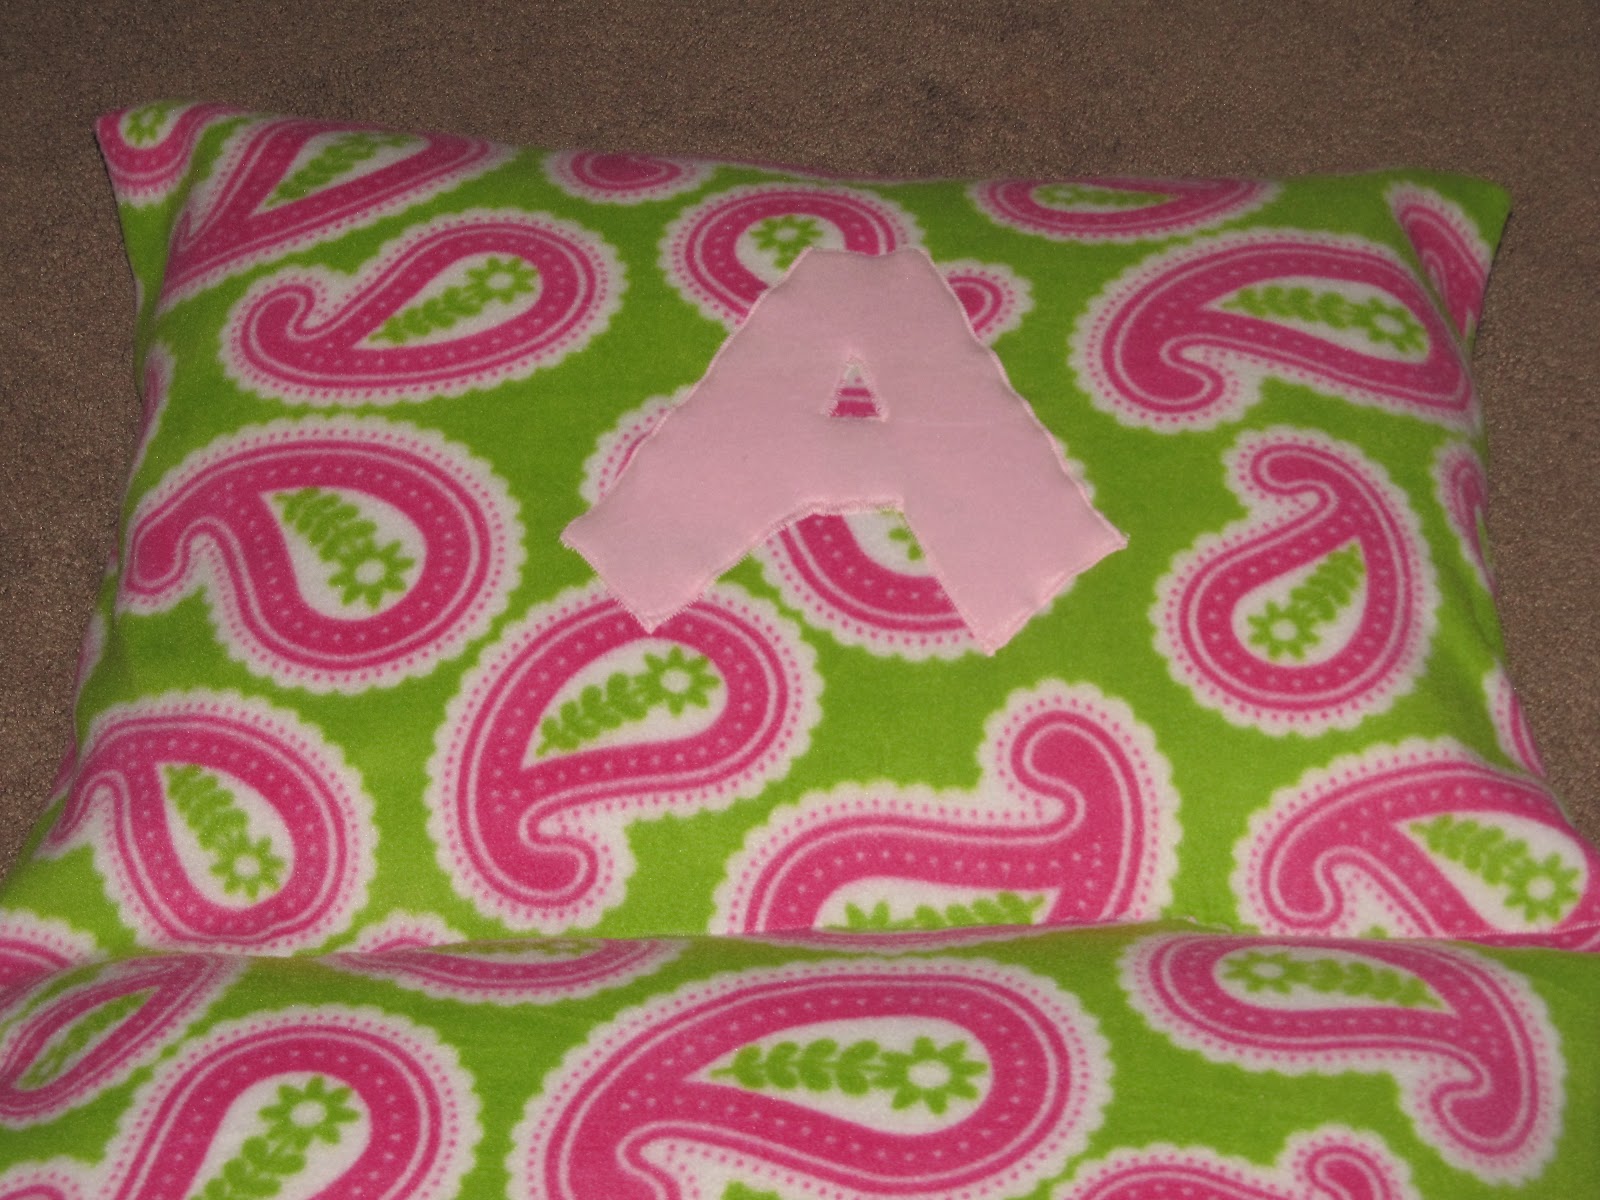
Then I went a little crazy. I decided to add a bit of personalization to it.
Did I mention this is a birthday gift for one of Little Miss's friends? I bet you'll never guess what letter her name begins with...

In case you choose to add a monogram letter, I would suggest doing this BEFORE you create the pockets for the pillows.
All folded up and ready to give to the birthday girl!
 |

You are a lifesaver I have been desperately looking for the same tutorial! And bonus...I think yours is easier to understand. Thanks so much!!
ReplyDeleteThanks so much for the feedback! Happy Sewing :)
DeleteThank you for this tutorial! Can't wait to try it for my son!
ReplyDeleteThank you for sharing! I had the same experience and was so glad to find your page. :)
ReplyDeleteYour mattress tutorial is good and informative. Thanks for adding this post.
ReplyDeletethank you!! i also read others and you make it so easy for me to follow!! Buying my fabric this weekend and i'm making 3 of these for my little monsters.
ReplyDeleteSo no hemming because the fleece won't fray, right? and it's extra soft! Looks great!
ReplyDeleteI hemmed mine to clean up the edges, but you are right fleece won't fray so you don't need to hem!
Deletethanks for this!!! I have one grand son and three more grand children on the way. These will make great gifts and also I can make one for each child to use when i baby sit or they visit etc.
ReplyDeleteThank you so much for this tutorial. I pinned this long ago and finally decided to do one of my pins and it was gone. I'm so thankful for this. The step by step instructions with the pictures make it so clear to understand. This will be the best gift of the party, hands down!
ReplyDeleteHow wide was the material that you used ? Because the one that I bought is 45 in wide and it doesnt fit around the pillows correctly .
ReplyDeleteThe no pill fleece I use is 60 inches wide
DeleteLahela, i had the same problem! I bought cars pattern one and for the cars to look right, the materials was to short to fit the pillow. Maybe it cant have pattterns that go one way, but a pattern that can go any which way? My email is sweetmommy4@yahoo.com....please let me know asap!!!
ReplyDeleteThis comment has been removed by the author.
DeleteThis comment has been removed by the author.
ReplyDeleteWhat kind of material did you use amd where did you get it? Its 60 inches wide right?
ReplyDeleteI used no pill fleece, I have bought it at both Joann's & Hancock Fabrics!
DeleteDid you completely sew in the pillows or is the back seams just folded over one another? Because what if you need to wash the pillow case? Can the pillows be removed?
ReplyDeleteThe back seams are just folded over one another so you can easily remove the pillows if you need to wash the cover! Also, the pillows I have bought at WalMart are washer friendly so they can be cleaned too but I do suggest you take them out of the case to wash.
DeleteThis comment has been removed by the author.
ReplyDeletei like the content of this blog. really help full blog. we can easily get to know about the best things.
ReplyDeleteMemory Foam Mattresses
though I still managed to flub it up a bit. But I loved the end result so much, I knew these would make for perfect gifts.
ReplyDeletemattress reviews ratings
Mmm.. good to be here in your article or post, whatever, I think I should also work hard for my own website like I see some good and updated working in your site. top rated mattresses 2012
ReplyDeleteIn order to distract myself from the fact the Hubs finally left back overseas, I dove headfirst into my projects! A few months ago, I found a tutorial on Pinterest best mattress for back pain consumer reports
ReplyDeletewow this good but ,I like your post and good pics may be any peoples not like because defrent mind all poeple , 2013 black friday
ReplyDeleteShannon Thx! Like you, I saw this project and wanted to see how it was put together and then couldn't find it. I'm a sewing lady and knew I could figure it out, I also wanted to put zipper in the ends so the cover could be removed for washing. I like the sham/envelop style better and much easier/quicker to make. I am well on my way to making several holiday gifts. Jennifer
ReplyDeleteAs a Newbie, I am permanently exploring online for articles that can be of assistance to me. Thank you black friday mattress sale
ReplyDeleteGreat idea i really wants to buy this kids mattress gives my kids more refreshment and they enjoy their playing more with them.
ReplyDeleteSorry just a bit confused, did you at any time sew the slots for the pillows? I see the even line going down the finished product. If so, how and what step is this? Thanks!!
ReplyDeleteGreat post full of useful tips! My site is fairly new and I am also having a hard time getting my readers to leave comments. Analytics shows they are coming to the site but I have a feeling “nobody wants to be first”.
ReplyDeletemattress for back pain
I would like to thank you for the efforts you have made in writing this article. I am hoping the same best work from you in the future as well. In fact your creative writing abilities has inspired me to start my own BlogEngine blog now. Really the blogging is spreading its wings rapidly. Your write up is a fine example of it.
ReplyDeletebest bed for lower back pain
I like your tutorial of Pillowcase Mattress
ReplyDeleteVery informative post! There is a lot of information here that can help any business get started with a successful social networking campaign!
ReplyDeletesleep sounds app
I would like to thank you for the efforts you have made in writing this article. I am hoping the same best work from you in the future as well. In fact your creative writing abilities has inspired me to start my own BlogEngine blog now. Really the blogging is spreading its wings rapidly. Your write up is a fine example of it.
ReplyDeletelabor day sales
Great post full of useful tips! My site is fairly new and I am also having a hard time getting my readers to leave comments. Analytics shows they are coming to the site but I have a feeling “nobody wants to be first”.
ReplyDeleteBlack Friday Mattress Sale
How wide is your fabric? I bought 3 yards and it's 42" wide but barely fits the pillows when I lay them down and try to fold each side over.
ReplyDeleteMy fleece was 58" wide
DeleteHi there, I found your blog via Google while searching for such kinda informative post and your post looks very interesting for me.
ReplyDeleteacmweb
I had never saw these pillow beds until exploring on pinterest tonight. I finally clicked on yours (there were soooo many on there) so glad I did, great tutorial and I am going to make one for my special little sunshine granddaughter. Can't wait until I get the fabric (Going to try Jersey knit I think) and can get started. Thanks so much for the great tutorial.
ReplyDeleteI had never saw these pillow beds until exploring on pinterest tonight. I finally clicked on yours (there were soooo many on there) so glad I did, great tutorial and I am going to make one for my special little sunshine granddaughter. Can't wait until I get the fabric (Going to try Jersey knit I think) and can get started. Thanks so much for the great tutorial.
ReplyDeleteVery nice pillows.Thanks for sharing this.
ReplyDeleteMattress in Chennai
It's really helpful thanks for sharing.
ReplyDeleteSleepyhead, a mattress designed to fit 90% of all body types. This bed-in-a-box is easy to order, unbox and sleep on! That’s why we call it Easy Peazy Mattress.
best mattress for back pain
Do the pillows stand up enough for the kids. I would think the pillows would fall and lay flat.
ReplyDeleteThank you because you have been willing to share information with us. check these best cooling mattresses we will always appreciate all you have done here because I know you are very concerned with our.
ReplyDeleteI want you to thank for your time of this wonderful read!!! I definitely enjoy every little bit of it and I have you bookmarked to check out new stuff of your blog a must read blog 100 silk pillowcase
ReplyDeleteAngst verschwendet nur Zeit,( máy khuếch tán tinh dầu )sie ändert nichts,máy khuếch tán tinh dầu refeshener zusätzlich nimmt sie die( máy khuếch tán tinh dầu ) Freude und macht Sie immer( máy xông tinh dầu phun sương )beschäftigt, ohne etwas zu erreichen.
ReplyDeleteВашата статија е одлична. Ви благодарам многу. Сакајте секогаш да успеете!
ReplyDeletelưới chống chuột
cửa lưới dạng xếp
cửa lưới tự cuốn
cửa lưới chống muỗi hà nội
Thanks for sharing amazing blog content, please visit us, if you are interested in purchasing home furnishing items e.g.
ReplyDeletesofa cover
Superb article and valuable information because it’s helpful for me. Thanks for sharing us. Google Business Profile SEO Services
ReplyDeleteDiscover exceptional value and comfort with budget coir mattresses available at any Centuary mattress showroom in Chennai. These mattresses are designed to offer robust support and durability without compromising on quality or affordability.
ReplyDeleteSleeping on luxurary silk pillow cases feels incredibly soft and soothing. They help reduce friction on hair and skin, making them a smart beauty investment. The comfort and elegance they bring to a bedroom are truly worth experiencing.
ReplyDelete